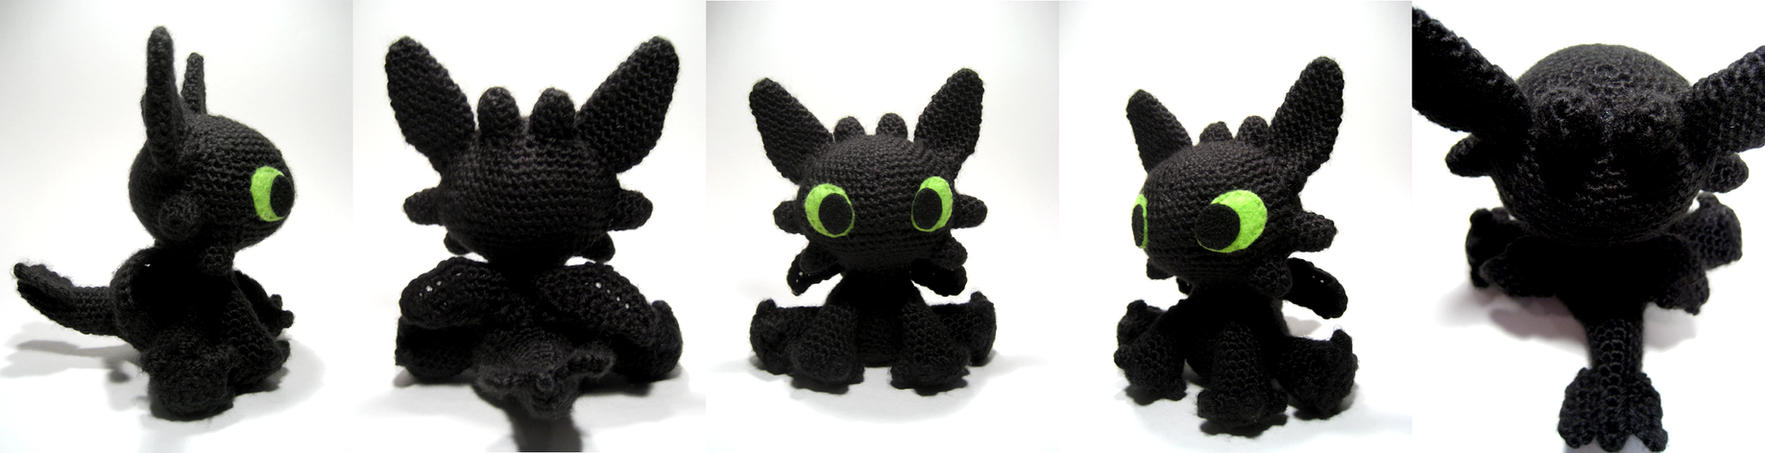
Here is my free pattern for my Toothless amigurumi -- while I designed and created everything in this photo, the instructions for the wings and tail fins that I post here were finalized by other people who kindly allowed me to share them, as I felt they worked better than mine, and the tail is a free pattern from another crochet blog, credited below. Please feel free to make as many Toothlesses for yourself or for your friends as you like, I only ask that you PLEASE do not produce these to sell for profit on sites like Etsy, or claim/sell the pattern as your own, since I worked very hard on this to share for free and because some parts of the pattern are kindly provided by people other than myself. Thank you for understanding!
THE PATTERN!
I used worsted weight yarn and a size F/3.75 mm hook. I was able to make all the pieces with 1 skein of Vanna's Choice yarn.

Important: in the instructions for the body, when I say "inc 2,"
I mean single crochet 3 into the same single crochet, so you are
essentially increasing by two stitches in the same stitch instead of
one.
Body:
R1. MR (6)
R2. Sc 2 in each sc around (12)
R3. (Sc 1, inc 1) 6 times around (18)
R4. (Sc 2, inc 1) 6 times around (24)
R5. (Sc 3, inc 1) 6 times around (30)
R6. (Sc 4, inc 1) 6 times around (36)
R7-8. Sc around
R9. Sc 12, dec 6, sc 12 (this is what shapes Toothless's butt) (30)
R10. Sc around
R11. (Sc 3, dec 1) 6 times around (24)
R12-13. Sc around
R14. (Sc 4, dec 1) 4 times around (20)
R15. Sc around
R16. (Sc 3, dec 1) 4 times around (16)
Fasten off, you don't need to leave a long tail for sewing. Stuff the body.
Head:
R1. MR (6)
R2. Sc 2 in each sc around (12)
R3. (Sc 1, inc 1) 6 times around (18)
R4. (Sc 2, inc 1) 6 times around (24)
R5. (Sc 3, inc 1) 6 times around (30)
R6. (Sc 4, inc 1) 6 times around (36)
R7. Sc around
R8. (Sc 5, inc 1) 6 times around (42)
R9. (Sc 6, inc 1) 6 times around (48)
R10-11. Sc around
R12. Sc 23, inc 2 in next 2 sc, sc 23 (52)
R13. Sc around
R14. Sc 25, inc regularly in the next 2 sc, sc 25. (54)
R15. (Sc 7, dec 1) 6 times around (48)
R16. (Sc 6, dec 1) 6 times around (42)
R17. (Sc 5, dec 1) 6 times around (36)
R18. (Sc 4, dec 1) 6 times around (30)
R19. (Sc 3, dec 1) 6 times around (24)
R20. (Sc 4, dec 1) 4 times around (20)
R21. (Sc 3, dec 1) 4 times around (16)
R22. Sc around
Fasten off and leave a long tail for sewing, then stuff the head. When
you stuff the head, you will need to do a lot of shaping. The
increases in rounds 12 and 14 give Toothless a bit of a point in the
front of his face, but until you stuff and shape the head it looks
pretty weird. I usually put more stuffing in the back of his head, a
bit less in the front, but enough in the point of his "snout" so that
it's clearly there.
I like to sew the body and the head together at this point. He has a
thin little neck so I usually skewer him from head to bottom with a
long knitting needle, it keeps everything in place.
*Toes: To make a toe, HDC 5 in the same st. When you finish the fifth
HDC, remove your hook from the loop, loosen the loop, reinsert your
hook into the first HDC, grab the loop you dropped and pull it through
the first HDC, like a slip stitch, then continue your round.
Front legs (make 2):
R1. MR (6)
R2. Sc 2 in each sc around (12)
R3. (Sc 1, inc 1) 6 times around (18)
R4. In BLO (except for the toes), sc 4, (Make toe*, sc 2) until you
have 4 toes with 2 sc's between each, sc 4.
R5. Sc around. You should still have 18 st. The toes take up a lot of
space and sometimes obscure stitches, especially the stitch right
before the toe, so those are easy to miss. If you have trouble seeing
it, just pull the toe to the left and you should be able to find it.
R6. (Sc 7, dec 1) 2 times around (16)
R7. Sc around
R8. (Sc 6, dec 1) 2 times around (14)
R9. (Sc 5, dec 1) 2 times around (12)
R10-12. Sc around
R13. (Sc 4, dec 1) 2 times around (10)
Fasten off and leave a long tail for sewing.
Back legs (make 2):
R1. MR (6)
R2. Sc 2 in each sc around (12)
R3. (Sc 1, inc 1) 6 times around (18)
R4. In BLO (except for the toes), sc 4, (Make toe*, sc 2) until you
have 4 toes with 2 sc's between each, sc 4.
R5. Sc around.
R6. (Sc 7, dec 1) 2 times around (16)
R7. Sc around
R8. (Sc 6, dec 1) 2 times around (14)
R9-10. Sc around.
Fasten off and leave a long tail for sewing. I prefer to sew the back
legs on before the front legs. When I stuff the front legs, I like to
stuff the bottoms and leave very little stuffing at the top, so the
legs can sit flatter against Toothless's front.
I sew all the way around the circumference of the back legs when
attaching them to the body, but when attaching the front legs I
typically squish the opening and sew the ends together as I sew them
on, if that makes sense. It's just another measure to make them
more flat.
Ears (make 2):
R1. MR (6)
R2. Sc 2 in each sc around (12)
R3-4. Sc around
R5. (Sc 2, inc 1) 4 times around (16)
R6-7. Sc around
R8. (Sc 3, inc 1) 4 times around (20)
R9-14. Sc around
R15. (Sc 3, dec 1) 4 time around (16)
R16-17. Sc around
Fasten off and leave a tail for sewing. You don't need to stuff the
ears, just squish them flat and sew them on.
Mini-horns (make 6):
R1. MR (6)
R2. (Sc 1, inc 1) 3 times around (9)
R3-5. Sc around
Fasten off and leave a tail for sewing. Two horns go between the ears
on the top of the head, and two horns on each side of his head.
Tail: I use the instructions from here:
http://mygurumi.blogspot.com/2009/08/only-to-show-you-im-still-here-post.html
and usually stop at round 15. You can make it shorter or longer if you
wish.
Wings (courtesy of Stitch Bitch):
ch 6, work sc in 2nd ch from hook and the one after it, sc 3 in next ch, sc 1 in each of the next 2 chs; ch1 and turn (7 sc)
sc in first 3 sts, 3 sc in next st, sc in next 3 sts; ch1 and turn (9 sc)
sc in first 4 sts, 3 sc in next st, sc in next 4 sts; ch4 and turn (11 sc)
sc in 2nd ch from hook and next 2 chs, sc in next 5 sts, 3sc in next st, sc in next 5 sts, 3 foundation sc; (19 sc)
ch 1, and turn
sc in next 9 sts, 3 sc in next st, sc in next 9 sts; fasten off (21 sc)
Tailfins (courtesy of TacticalGranny)
set A (base of tail near body):
Make two and attach to center line of tail near the body.
Ch 5, work sc in 2nd ch from hook, sc 3 in next ch, ss to last ch and fasten off.
Tailfins set B (end of tail):
Make two black, or make one black, one red. Red goes on the left side of tail when the tail is facing you.
Row 1: Ch 5, work sc in 2nd ch from hook, sc in next 2 ch, inc in last ch; ch 1 and turn (5sc)
Row 2: sc in first 3sc, sc2tog in last 2 sc. ch 1 and turn. (4sc)
Row 3: sc in first 2sc, sc 3 in next sc, ss (slip stitch) to last sc. Place 2 more ss through ends of previous rows to form the curved shape at the end of the fin. Fasten off and attach to tail.
Eyes:
The acrylic felt that I used for the eyes can be purchased at Michaels, Jo-Ann's, AC Moore or any general craft store. You can find it in the kids craft section with the school craft supplies, pipe cleaners, pom-poms, popsicle sticks, etc. They come in small, individual sheets that cost about 25 cents apiece, so I buy plenty in case I need extra!
You can also use real felt if you desire, though I only have experience using the acrylic craft felt. I cut out the general shapes (you can right-click save the image provided at the top of this pattern and print it out and it should print to the correct scale, but it is just as easy to draw it yourself):
I use these scissors to cut out my eyes since they are small and precise. I fold the sheet of felt in half and cut out the general shape of the eye, a bit larger than I want it to be so I can cut it down, refine the shape and make the edges nicer. Folding it in half will give you two pieces that are generally the same shape, then you can cut them down and make them look nicer as I stated before. Do the same with the felt for the pupils.
Because of the bumpy texture of the crochet, I find that it is easier to use fabric glue to apply the eyes rather than sewing them on. The shape of the eye stays more consistent. I like to use Fabri-tac glue... be advised that it dries quickly and is quite permanent, so be careful when gluing your eyes on.
kiasdf;ksjadkfjsddfk. THANK YOU. SO MUCH. I LOVE YOU WITH MOUTH. I signed up for this blogger thing just to comment. :lllllll ... c: <3
ReplyDeleteThis comment has been removed by the author.
ReplyDeleteHi! Thank you so much for writing this up. I really enjoyed making my little Night Fury. The wings worked out really well!
ReplyDeletehttp://lemmyloop.blogspot.com/2011/06/night-fury-amigurumi.html
Fantastic, I'm making this now and it is a wonderful pattern. Thank you so much!
ReplyDeleteThanks for sharing the pattern. I made this one and the finished product is here: http://blog.redostrike.be/blog/?p=366
ReplyDeleteThanks again.
I made one two, and there's a link in the description for patterns for the tail and butt wing/fin things for anyone to use if they like!
ReplyDeletehttp://uropygid.deviantart.com/art/Chibi-albino-Night-Fury-244439772
gracias por los patrones estoy comenzando, con los amigurumis, me cuesta un poquito de trabajo comprender algunas indicaciones pero me las arreglo,que Dios lo bendiga por compartir , felicidades
DeleteI love this!! Is that just felt you used for the eyes?
ReplyDeleteMR means what? (sorry imma beginner)
ReplyDeleteMagic ring. Theres loads of video's on youtube on how to do them :).
DeleteLiz - yep, I just used the craft felt that they sell in small individual sheets.
ReplyDeleteAkiwyn - MR is short for 'make ring', some patterns use the term 'ML' for 'make loop' or 'magic loop.' The technique is covered in this video here: http://www.youtube.com/watch?v=kvjYPFBP85c
Thank you so much! I just want to do that lil cute Toothless! :)
ReplyDeletesc 1 inc 1 means = sc 1 and 2 sc in the next st
ReplyDeleteI love this pattern <3
ReplyDeletei LOVE this pattern truly.....so much so i had to then make a hiccup to go with my toothless....the only thing i found was that the pattern ears were far too large so i shrunk them down a bit XD
ReplyDeleteHaving two left hands, this kind of craftmanship is way out of my league. I guess you making a Toothless for me is out of the question? :)
ReplyDeletethank you for the pattern love the toothless and so does my daughter all tho mine didn't turn out as good as yours lol but she still loves it.. here is a picture of mine on my blog http://lifeandcrochet.blogspot.com/ please fallow :)
ReplyDeleteSo far I've got a head, body, & all four legs stitched together, and I'm loving this pattern! I was tickled pink by the adorable toes! Now I'm working on the tail, but I'm having a lot of trouble with it. I posted a comment over on that site, but I thought I'd check here too, to see if anyone had any suggestions.
ReplyDeleteThanks so much for posting this amazing pattern!! I love Toothless and I can't wait to finish him!
This is adorable and I can't wait to start it. I just had one question - how much yarn [roughly] is used? I want to know if I can just use what I have or if I'll need more.
ReplyDeleteThanks so much for the pattern!!
This comment has been removed by the author.
ReplyDeleteSo I've made everything but the wings because I have no idea what a formation stitch is...I've looked it up but I am teaching myself crochet and I must be missing something since they are all chainless and this project already has a base chain to follow before the foundation stitch... can anyone try explaining it to me? :/
ReplyDeleteSorry meant *foundation sc :/ this has been frustrating me for awhile. Maybe I'm over thinking it
Deletehttp://dorischancrochet.com/foundation-single-crochet/ Is a great tutorial
DeleteI found this video about *fundation: https://www.youtube.com/watch?v=0FBi5zxtTI0
DeleteAww, adorable! I had to make an account here to comment. I feel horrible for asking because I wouldn't want you to cut one of these cuties up just to make one.. but to you by chance have a sewing tutorial for this? I have ZERO skill with crochet or knitting... (though I haven't tried knitting, I still don't think I will). As much as I love the patterns I've found on DeviantArt for Toothless (and I've made two different ones), this one I just cannot resist making, but I only have a skill in sewing with fabrics.. hehe.
ReplyDeleteEither way, this is adorable! My mother in law and crochet and knit, so maybe I'll ask her to make this for me. :)
Can you explain this to me? I don't get the abrev. This is from the blog you referred to for the tail. Thanks.
ReplyDelete"make a double ring with 5 sc2 - m2, sc43 - sc1, m2,..." I don't get what (m stands for in m2. Absolutely adorable pattern by the way.
M2 (make 2) is another way of saying increase by 1 in that stitch. M2 X2 means increase by 1 in next 2 stitches.
DeleteI honestly don't understand how you can sc 1, inc 1, to get 18 but there are only 12 stitches. How will it be 18 if you're doubling the stitch, it would make 24. I guess i'll just make my own pattern because this one makes no sense to me. Also, why couldn't you just say 2sc in same stitch around instead of 1sc, inc 1. that's stupid and kind of unnecessary.
DeleteNeverGiveUpNeverSurrender-sc 1=sc in 1 stitch then inc 1= sc and another sc in the same stitch. inc 1 is actually inc 2 in same stitch in some patterns. So you will get 18 if you do sc in 1 stitch, then 2 sc in the next. It's just this author's abbreviation.
DeleteNo puedo entrar para hacerle la cola a chimuelo que alguien pase el patrón
Deletei'm a beginner and i really love doing this, so far i only made head and body, can i ask, what is 'HDC 5 in the same st'?
ReplyDeletehdc = half double crouchet
Deletei'm a spanish beginner and the translate is difficult sometimes jejeje, but when i finish the work i'll be very happy (sorry for my english)
oh its ok, i'm a malay, btw, about HDC, i found that in youtube, yeay~ i already finished the whole 4 legs, and now i'm making the ears..thanx for the reply. XD
DeleteHi! Im also a beginner and cant understand how HDC words on the legs. could you show me the video you found on youtube?? THANKS
Delete*works (sorry for my english)
DeleteMe falta la cola pues no encuetro como hacerlo
DeleteI made this for my nephew for Christmas and it was easy and super cute.
ReplyDeletewhat's is BLO?
ReplyDeleteBLO means back loop only
DeleteThis comment has been removed by the author.
ReplyDeleteFor some reason this post was messed up, hopefully this one won't be lol. Anyway, thanks for the pattern. I made one.
Deletehttp://stupidcrayon.tumblr.com/post/27773595204/i-made-toothless-from-how-to-train-your-dragon
I'm.so excited about this! Thanks for your hard work!!
ReplyDeleteThanks so much for this pattern! here's a link to the first Toothless I made -> http://the-carolyn-michelle.deviantart.com/#/d5hrw10
ReplyDeleteI'm working on some more as Christmas gifts! Thank you so much for all your hard work and for sharing this pattern for free.
thank you for these pictures!!! i needed a clear picture of how someone did the wings and yours was perfect!!!
DeleteI'm total rubbish when it comes to reading patterns; but for Toothless, I'm gonna try!
ReplyDeletethis is AMAZING. Toothless is one of our family's favorite animated characters and I'm going to try to make this for my sister this Christmas, thank you soooo much for posting this! Keep it up!
ReplyDeleteThank you so much for your generosity in sharing this pattern for free. It was a pleasure making Toothless and my son is delighted with his new toy :)
ReplyDeleteYou are an angel!! my boyfriends b-day is coming up and he loves this movie... its gonna make a great b-day present! I thank you for making your pattern free!
ReplyDeleteblessings!
Thank you for sharing!
ReplyDeletepretty good work
here is my Toothless - wo love him
http://aliswerk.blogspot.de/2013/01/ohnezahn.html
LG Agnes
where did you find your safety eyes?
DeleteI found them in the store for handicraftsupplys (sorry, don´t know the right word) in our town
DeleteLG Agnes
Thanks for this pattern, it turned out great! Lengthened the tail a bit and modified tailfins set A: http://crochetplusplus.blogspot.com/2013/01/baby-toothless.html =)
ReplyDeleteWhen you say 6 times around do i actually go 6 times around?
ReplyDeleteno, just repeat 6 times till you reach your start point.
DeleteWhere I can find the pattern in spanish? I want to make some for my boyfriend he loves this dragon sooo much
ReplyDeleteCan someone make one for me? I can't crochet/knit and I don't understand the instructions. I live in the UK and could send you one of my homemade gifts. :-)
ReplyDelete2 questions for you:
ReplyDeletehow do you tell the front from the back of the head?
which way do the fins go on the tail? I can't tell by the pic for both sets of fins.
my ears seem really big compared to your pics, not sure what happened but I had to pull back a couple of row to get the same look.
Thank you so much for the pattern! he is super cute and pretty easy/quick to do comparatively.
Hi there -- so sorry for the late reply! I don't know if you still need help at this point but anyway:
DeleteThe back of the head is rounder, and the front of the head has a bit of a "point" to it in the front, where you made the cluster of increases to create the snout.
It's been a while, but if I remember correctly, I believe the tailfins go on the tail like this (if you're viewing the tail from above): http://i.imgur.com/Glkn45f.png
The smaller end of the tailfin is closer to the body while the larger end is nearer to the tip of the tail.
I hope that makes sense, and again, I'm so sorry for the delayed reply -- I don't get any kind of notifications of comments/questions on here so I always end up seeing them so late :( Anyway, I'm so glad you like the pattern otherwise!
I love it!!
ReplyDeleteWAUW
ReplyDeleteI wanna make this one for my little cousin. He will like it very much. Thank you for putting it out on the internet.
But I don't understand the explanetion of the wings and the tailfins very good because it's another way to explain ;)
Can you say it in your way, because that way i do understand. :)
THANKS A LOT!!!!!
This comment has been removed by the author.
ReplyDeleteI'm loving this guy and i'll be making plenty of them but for some reason i'm a little silly and I really don't understand the toes! I know the abbreviations but every time I look at the pattern I get confused! I'm going to power through it though! I have to for the sake of Toothless!
ReplyDeleteWhen dec(reasing) do you recommend doing an invisible decrease, by just hooking the front loops?
ReplyDeleteThank you!
Hi, I'm having a hard time trying to do the toes, I get confused with row 4 "R4. In BLO (except for the toes), sc 4, (Make toe*, sc 2) until you have 4 toes with 2 sc's between each, sc 4". Do you mean single crochet BLO for four stitches with two stitches in between ir BLO 2 stitches and have four stitches in between?
ReplyDeleteThanks
I have a hard time understanding this part as well. If someone could give some insight.
Deletehola yo tengo el mismo problema, lo pudieron resolver? q significa BLO?
DeleteBLO:back Loops only
DeleteIt means you stich 4 in the back Loops only then can you make a toe not in the back loops then you Stitch two in the back Loops only then you make a toe not in the back loops then you Stich two in the back Loops only and you do the same thing over and over again (exept for the 4 stiches in the beginning) until you have four toes with two stitches in the back Loops only in between each then you stitch 4 in the back Loops only and that is the end of row
Hi, I am about to attach the tail and was just wondering if you stuff it before sewing? From the way it looks in your photos I would assume yes but the pattern does not specify.
ReplyDeleteHi! I'm just now translating your pattern to spanish for my blog, I named you in all moments, and I will appreciate if you could give me permis to share this translation in my blog.
ReplyDeleteThank you! I really love this pattern!
I finally got mine done. I did it for my son's 10th birthday which was 2 months ago and I just finished it today. :( He loves it though. Thank you so much for the pattern! Don't know if this will let you see my picture: https://www.facebook.com/photo.php?fbid=10200581361530763&set=a.1186850365678.29313.1660865230&type=1&theater
ReplyDeleteHi, would anyone be able to tell me the finished size of Toothless (height and width)? Thinking of using him as a cake topper but need to know how big of a cake base i will need to bake. Thanks.
ReplyDeleteMine is roughly a foot wide at the base at the longest point. 6 inches tall. But I modified my tail, so it will probably be shorter for you.
DeleteHi, I follow your blog :) nice work! That toothless it's so cute XD
ReplyDeleteVisit my amigurumi's blog :)
http://mirthamigurumis.blogspot.com
Hi, thx for these cute pattern. I Try to make the pattern, but
ReplyDeletei´m from Germany and have to translate it. Thats no Problem, but the pattern from Diana for the tail is hard to understand. Could you explain these tail pattern with your Words?
I doesn´t understand M2 and sc2tog. Always I have more stiches i need.
Thx :-)
Can you please make a youtube video of this? I tried doing this but I need a visual to understand.
ReplyDeleteHi! Thanks a lot for this pattern. My toothless amigurumi is finished, although I'm not very good at cutting felt and the eyes are slightly different :D
ReplyDeletehi i am making this and like the pattern but am very confused about the wings....i do not know how to sew it on or if i make 1 or 2 since i can not see the pictures clearly of what it is supposed to look like or how to place it on. please help!!! :(
ReplyDeleteThe "wings" is one piece. You sew it in the center of the backside of the body.
DeleteI made 2 wings. This link from an earlier post (http://the-carolyn-michelle.deviantart.com/#/d5hrw10) shows a good picture of the back. It helped me.
DeleteThis comment has been removed by the author.
ReplyDeleteHello,
ReplyDeleteI write for a site called Geek Crafts and I just posted your awesome
Toothless amigurumi tutorial. You can see the post here -
http://geekcrafts.com/14683-here-be-dragons/. We'd love
it if you could link back to us from your blog or profile.
Be sure to send us any other geeky crafts you make so we can post
those too. Thanks so much!
Yours,
Grace
Is it ok if I post a dutch translation of this pattern on my blog?
ReplyDeleteOfcourse with a reference to this page.
I haven't tried it yet, but I can see from the replies it is easily understandable. So I will translate it for my self and try it out. If it works I would like to post it (for free ofcourse, as it isn't my own pattern) so other Dutch crochet fans can use it too.
hi, did you get an answer? i want to share it also in german.
DeleteNo, I didn't...
DeleteJust send her an email and we have permission. So if you would still like to use it, it's ok.
Deletehttp://www.pinterest.com/pin/98727416805644196/ http://www.pinterest.com/pin/98727416805644199/
ReplyDeletehttp://www.pinterest.com/pin/98727416805644210/ I made my own wing pattern that looked more like the ones that the cartoon had and everything is sewn together a bit crooked. I am a beginner and this had a lot more parts then any previous pattern than I have done. All in all the pattern was very easy to follow and he did turn our very cute. Thank you for posting the pattern.
Hi !
ReplyDeleteThanks a looot for your pattern !
Here is my little toothless if you wish to see it, I only changed the eyes a little bit by doing them in crochet too! http://ahooka.canalblog.com/archives/2014/01/23/29026936.html
mille merci pour ce partage, c'est un de mes personnage préférer
ReplyDeleteThanks for the pattern, I finally had time to crochet it and I love it! Done some minor changes (front legs and ears smaller and top horns larger). Usually I crochet items to sell, but this dragon is mine!!
ReplyDeletehi, i'm from germany and have seen this pattern. i'm in a facebook crochet group and many of the users asked me if they can have the translation i had made. now ist my question if i can share the translation i had made from your pattern. i dont sell it. just share in german language :D please contakt me - thanks a lot
ReplyDeleteThis comment has been removed by the author.
ReplyDeletehey. do you end each round with a SS, and start the next round with chaining one. or do you just continues with SC, and dont SS and chain?
ReplyDeleteit's a contentious loop. No joining the rounds as it ends up looking like a spiral. Use markers to rememberer where you are in the pattern if it helps.
DeleteI joined my rounds, and it worked out fine for me. I just counted my stitches after joining the rounds. I did not chain at the beginning of a new round though.
DeleteIt is so cute and you very talented! I made one for my best friend and she loved it. Thank you.
ReplyDeleteThanks for the fantastic pattern. Made a short post about it on my blog. Used a metallic yarn and really came out cute! http://littleblackmarker.com/2014/06/toothless.html
ReplyDeletewhat do you use to stuff the head and the body?
ReplyDeleteHi you can use fiberfill, scrap cloth or scrap wool to stuff your toy's with. But I might suggest fiberfill it's super cheap and oh so fluffy!
Delete"R9. Sc 12, dec 6, sc 12 (this is what shapes Toothless's butt) (30)"
ReplyDeleteis that a standard Dec or a miss 6 stitches dec?
sc12 dec (6x) sc12
DeleteI had this problem too. Make sure you have 36 stitches when you get to this part. If you don’t go back and do 1 inc and 4 sc, to come out with 36. Then you can do the next part right.
DeleteThis comment has been removed by the author.
ReplyDeleteThis comment has been removed by the author.
ReplyDeleteThanks a lot for this amazing pattern. I Put myself one. Please be free to see it here : https://www.facebook.com/aufildemesenvies
ReplyDeleteI crochet the eyes thanks to this tuto ; http://www.louiesloops.com/2012/10/let-them-eat-cake.html until Round 6 and then I made 6sc in a MR and I increase until to have 24 stiches.
See you
Thank you for the free pattern! I almost bought it on Listia.
ReplyDeleteThank you so much for you're work and the free pattern..I love Toothless so much and I search this pattern for some hours and then i Found this..THANK YOU!!! I'm going to do it right now :)
ReplyDeleteThank you so much for your work and generosity. I can't imagine creating a pattern like this even though I have been crocheting for many years!! I just finished him today and can't wait to give him to my granddaughter
ReplyDeleteThank you for the free pattern. but i have a question. Having trouble understanding this line on the body..R9. Sc 12, dec 6, sc 12 (this is what shapes Toothless's butt) (30)
ReplyDeleteIt does not add up to 30
sc 12 decrease (6x) sc12 and it should add up to 30 hope it helps
DeleteIt doesn't add up to 30, and it makes the body a funny shape. What I did was sc15, dec 6, sc 15 (30). And it added up nicely for me!
DeleteYou may be misunderstanding the directions.
DeleteThe row you will crochet into has 36 stitches. When you dec 6 (sc2tog 6 times) you have decreased 12 of those stitches into 6.
{SC 12, dec (6x), SC 12} gives you 30 stitches for that row. 12+6+12=30.
Hope this helps.
I had this problem too. Make sure you have 36 stitches when you get to this part. If you don’t go back and do 1 inc and 4 sc, to come out with 36. Then you can do the next part right.
DeleteThanks a lot for the pattern. But I don't understand the "-8 sc around" part. I'm pretty sure that is something very simple, but I don't get it. Thank you!
ReplyDeleteIt is just 8 single crochet around total. One in each stitch,
DeleteThe wording on the wings are throwing me off. On the 4th row is it saying 9 sc, 3 sc in next st, 8 sc? What is foundation sc? Thank you for any help.
ReplyDeleteThe 4th line doesnt say anything about 9sc, it´s the fifth and it says: 9sc, 3 sc in next st, another 9sc and finish.
DeleteHello everybody! Having seen all the chaos caused by the wings and other parts of this pattern, I have started a blog where I explain (pictures included) how I did the wings and the mistakes I made before succeeding. I hope the owner of sarselgurumi likes this idea :) I will keep updating the blog with every problem I face making toothless, as well as many other amigurumis. Enjoy! http://hoshiamigurumi.blogspot.com.es/
ReplyDeleteTHANK YOU SO MUCH FOR THIS! I was having the damnedest time trying to figure out that pattern.
DeleteI think the OP should put this at the top of the original post! (:
That looks so cute and awesome! Thank you so much for sharing this. I'm trying to make one for my nephew as a christmas gift. Hope it looks as great as yours :)
ReplyDeleteHi, I have almost finished my Toothless but can't get through to the link for making his tail, can anyone help please, loving the pattern, thanks for sharing it :)
ReplyDeleteTry Doing a web search for mygurumi.blogspot. Select Free Patterns from the home page and you will see picture of a pink horn. That is what is used for the tail.
Deleteuna consulta cuando tejes el cuerpo. en la vuelta num 9 es una sola disminucion? ( 12sc. 6 dic. y 18 sc)? o ( 12sc. 6dic. 12 sc y 6 dic)?
ReplyDeletealguien sabe q significa BLO y HDC?
ReplyDeleteUse back loops only for the SC, then use both loops when making the HDCs.
DeleteHaving trouble on ears part where it says
ReplyDeleteR5. (Sc 2, inc 1) 4 times around (16)
R6-7. Sc around
R8. (Sc 3, inc 1) 4 times around (20)
R9-14. Sc around
R15. (Sc 3, dec 1) 4 time around (16)
R16-17. Sc around
Can i ask where your having problems with?
DeleteThis is probably more information than you need, but I'm not sure what part is problematic...
DeleteR= rounds.
(Sc 2, inc 1) 4 times around = crochet 1 sc in next 2 stitches, 2 sc in next stitch. Do this 4 times and you will be back at the start of your row having crocheted 16 stitches.
R6-7. Sc around = crochet 1 sc in each stitch if the previous row. Because it says R6-7, you do it for 2 rows.
Hi, just one little question :)
ReplyDeleteWhat do you mean with " inc regularly in the next 2 sc," ?
Does it mean the same like "inc 1" (in the next two sc)?
I'm unfamiliar with the english crocheting words, and this is my third amigurumi, what means my experiences are not so high :)
PS: Sorry for bad english :D
DeleteYes. "Inc regularly in the next 2 sc" means that you only increase by 1 in those stitches. This was in the "Head" section just after rows where you "inc 2"... which means 3 stitches in those SCs.
ReplyDeleteDon't feel bad. I've only done these in English but the terms can be confusing to me at times :)
Ok, thank you! =)
DeleteI'm done! *__* I love my Toothless! :))
DeleteThank you VERY MUCH for this awesome pattern!! =D https://fbcdn-sphotos-h-a.akamaihd.net/hphotos-ak-xpf1/v/t1.0-9/1926717_10203691208869710_3890484708304051675_n.jpg?oh=2384fb162d535f0d39fa0d30741e88ca&oe=557EFC45&__gda__=1434585978_d88dc51324afb9a85f877892583969f4
Hello!! Awesome design. Can I translate your pattern to spanish and make it a pdf file? - of course, always linking back to your blog!
ReplyDeleteI would love to post the translation on my blog too.
I made this for my sister for Christmas :). We both love Toothless! But, even if I hadn't been a Toothless fan, this pattern was the most fun I have ever had with a written pattern :)! I love all amigurami projects, but I usually enjoy it most if I make up my own pattern. But this one was so much fun, with neat techniques, simple to make, with just enough differences in the pieces that it didn't feel like I was doing the same two pieces over and over like some projects do :). His little toes and wings were especially fun to make :)!
ReplyDeleteThank you so much for this pattern!
Bri, 17 year old blogger of "Forget Not His Benefits", a blog on Thankfulness, Family, and Following God :).
vidio tutorial please i'm beginer and bad speak and read english
ReplyDeleteThanks a lot for this amazing tutorial! I made myself one, it's great, I absolutely love it! I had so much fun. Much cuter than most Toothless toys you can buy. You did a fantastic job with this pattern.
ReplyDeleteThanks for sharing the pattern. The result is an absolutely adorable Toothless: http://descabdello.blogspot.com.es/2015/03/vols-fer-el-drac-toothless-de-ganxet.html
ReplyDeleteMine looks just like your picture.now to make one in lilac for my little girl.thankyou so much for sharing xxx
ReplyDeleteHello!
ReplyDeleteFirst of all, thank you so much for sharing us your patern! He is adorable! My friend is a fan of this cartoon, and I'd really like to give him this toy!
However I am French and I do not understand the last part on the wings and tail ... Could you try me translate it into the same version as for the body, for example?
Hi, thanks for the nice guide !
ReplyDeleteI have the manual translated into my German.
Now I would like to give you this, so you can publish them here.
Then I can share the link to your blog with the German instructions <3
Or I'd pass on the translation only private, always with a link to your own site and for free of course .
If you are interested , please email me at:
selivra@online.de
( Text by Google translator xD )
thank you for the pattern! adorable, love it <3
ReplyDeleteThanks for the pattern my daughter (26 years old) has been nagging me to make one of these for ages. Can I also have your permission to make one as a raffle prize and make a small charge just to cover yarn?
ReplyDeleteIn having trouble with row three... I'm so confused as to what sc 1 inc 1 means and what do you mean when you say six times around? Do I have to do it for 6 stitches? Because if I do it all the way around to me starting point I get a much larger amount of stitches that what's indicated in the pattern, I'm so confused help please!
ReplyDeleteHi Seline
Delete"(Sc 1, inc 1 ) 6 times around "
Sc1 means you crochet 1 sc in the first stitch. Inc 1 means you crochet 2 sc in the next stitch. Perform this 6 times and this row will end up with 18 stitches total.
This is how the whole pattern is written. Inc 1 means you crochet 1 sc + an increase of 1 sc = 2 sc in that stitch.
Using that basis, inc 2 = 3 sc in that stitch.
Hope this helps!
Thank you so much Becca! This helped a lot, is it the same for dec 1? Like do you have to sc 2 together for that one stitch? Like when in one of the rows it says dec 6 does it mean decrease for 6 stitches?
DeleteYes, dec, aka decrease, is subtracting a stitch from a row by crocheting 2 sc together. When this pattern says to dec 6, it means that you will be performing the following steps 6 times.
Delete1.) insert your hook into the indicated stitch
2.) Yarn over (yo) and draw the yarn through the stitch.
You should have 2 loops on your hook
3.) Insert your hook into the next stitch
4.) Yarn over and pull through both loops.
1 dec complete. Do this 6 times (or as many times as indicated)
Best of luck! Feel free to email me with any additional questions as I'm not certain this site is monitored anymore
😺
B3ccabuu@yahoo.com
DeleteSorry not sure if my question went through....why are the dimensions of the finished product, I'm thinking of making this for a friend. Thanks for the adorable pattern! :-)
ReplyDeleteSorry ...WHAT are the dimensions?
ReplyDeleteMy finished Toothless, including ears, wings and tail has the approximate dimensions of:
ReplyDeleteH - 8 inches
W - 8 inches
D - 7 inches
Watch Dragonball Super Episode 6 Online Here:
ReplyDeletehttp://www.soulgaminghacks.com/dragonball-super-episode-6-online/
http://www.soulgaminghacks.com/dragonball-super-episode-6-online/v
http://www.soulgaminghacks.com/dragonball-super-episode-6-online/
http://www.soulgaminghacks.com/dragonball-super-episode-6-online/
Problem. If you do 3 sc in 2 stitches on the head that means you ihave increased 4 stitches but the patterm says you go from 52 st to 54 but I end up with 56 st. Messing me up. Confused ! Lol
ReplyDeleteYou only do a regular increase in the 25, inc x2, 25 row.
DeleteP.s. Talking about row 12 on the head Thanks.
ReplyDeleteThis comment has been removed by the author.
DeleteThe increases in row 14 ("increase regularly ") only increase once in each stitch, therefore only increasing the whole row by 2 from 52 to 54.
DeleteHope that helped!
I cant get in the site for making the tail.
DeleteSorry I see you answered that already
ReplyDeleteHi this project looks great. But I cant get on the link for the tail. Is there anywhere else I look . I'm hoping to make this for my lg who is a huge fan of toothless. Tia 😊
ReplyDeletehttp://www.cinnamonpurl.com/only-to-show-you-im-still-here-post/
DeleteThat's where the tail has moved to!
I'm stuck, can someone please help? Pattern says "make a double ring with 5 sc". How is this done? Also next line reads " m2, sc4" what is the abbreviation "m" mean? Thanks!
ReplyDeleteSherryLynne
Tqsm for the pattern..
ReplyDeleteHi would it be possible to make a video as really finding it hard
ReplyDeleteShe doesn't really moniter this pattern anymore. I will be happy to help you if I can, however. What are you having trouble with?
DeleteHi I'm having trouble with the wing could u please help as im new to this I have made the body and head but can't figure out how to do the wings
ReplyDeleteOkay, so I am a novice crocheter and self taught but I am having a difficult time with this pattern. In the body, if R3 leaves me with 18 stitches and then R4. (Sc 2, inc 1) 6 times around it leaves me 6 stitches away from the end of the row?
ReplyDeleteYou don't count the first sc2, Inc 1. Essentially you do it 7 times, not six.
DeleteThank you for the great pattern, it took me some time to change it to a bigger size but i love the result. If you like you can view it here https://www.facebook.com/670173813086715/photos/a.671004026337027.1073741830.670173813086715/792319997538762/?type=3&theater Thank you again !
ReplyDeleteGracias por compartir tus patrones, puedes ver cómo me quedó buscando en Facebook como 'Amigurumi Crochet Angelius '
ReplyDeleteHi, thanks so much for pattern. Do you have video to teach this. Thanks again.
ReplyDeleteThis comment has been removed by the author.
ReplyDeleteHi, I love this pattern so much and already have five friends who want one, but now I'm completely stumped by tailfin A. I have no idea how to do it or where it even goes. Can anyone help me please? Would be much appreciated! Thank you.
ReplyDeleteHi Katrin.
DeleteI skip Tail Fin A as I did them on my first one but found that they aren't necessary. You can't even see them.
If you do want to do them, they go on the top of the tail, right below the wings but honestly, Tail Fin B is what you actually see.
Hi Becca,
Deletethanks for the quick reply. I might just skip them, then, as I also couldn't even see them in the picture. :)
This is so cut, so i tried to make it, but i got stuck with how to make the toes. can anyone help me? my english isnt very good since im dutch so my mom can't help either. thnx in advance
ReplyDeletecute* :p
DeleteHi Shanaa. The toes are created by making what are also known as HDC popcorn stitches. https://youtu.be/SzPEQzoMH08
DeleteSo, to complete R4, SC in the back loops of the first 4 stitches, then you make a HDC popcorn stitch. You then place a SC in the backs of each of the next 2 stitches, then make another popcorn stitch. You will make a total of 4 popcorn stitches, then end your round by placing a SC in the backs of the last 4 stitches.
If you need additional help, please mail me at b3ccabuu@gmail.com. Good luck!
would anyone know of a knitting pattern for this?
ReplyDeleteCan you please explain further into the toe making part? I'm an intermediate and it is still a bit confusing. Thanks!
ReplyDeleteI'll help clarify if I can. Which part of the toes in particular are you having trouble with?
DeleteI had a problem too with the toes but i found this site with pictures wich helped alot. i hope im aloud to post link here :)
Deletehttps://rachchua.wordpress.com/2014/05/19/step-by-step-tutorial-toothless-from-how-to-train-your-dragon/
For not getting lost, I used some stitch markers. With them, I marker the following stitch and the first HDC stitch. For example: if you are doing a toe on the 5th stitch, I mark th 6th stitch of the round, and the 1st stitch of the toe, so I dont get lost :)
DeleteThank you so much for the pattern, just love it :) My Toothless: http://sarselgurumi.blogspot.com.ee/2011/05/toothless-amigurumi-pattern.html
ReplyDeletei love it.. thank you so much for sharing
ReplyDeleteHello, thank you for this awesome pattern....I am now the aunt of the year !!!! I wonder if you know, but someone is selling your pattern (or seems like yours with a minor change in the tail) ....I just thought you should know.
ReplyDeletehttps://www.etsy.com/ca/listing/290372899/crochet-your-own-toothless-pattern-only?ref=shop_home_active_6
Hello, your Toothless is amazing, may I say. But I am a beginner and I don't understand some of the notes: Do I have to chain one when I begin a round? Do I have to skip a fake stitch? Do I have to slip stitch? Thank you for your answer.
ReplyDeleteThis comment has been removed by the author.
ReplyDeleteThank you so much for sharing the pattern
ReplyDeleteBut I need help please in
Head:
R9 get us 48 st
R10+R11 also 48 ..no increase
R12 as you said 23 sc ,2 inc in 2st, 23 sc (52)
But That mean we have 46 sc + 4 st from increasing =50 st total.
How it come 52 from 48?
Thank you in advance
Oh ..You already answer this before 😊
DeleteBut I still stuck on tail ...
Hi. I'm bad at reading patterns so I normally watch videos to help me crochet the things I want to crochet. Could you please make a video.
ReplyDeleteHello, the head should be
ReplyDeleteR12. Sc 23, inc 2 in next 2 sc, sc 23 (52)
or
R12. Sc 23, inc 3 in next 2 sc, sc 23 (52)
these instructions are worthless! After I finished the body, It looked like a crocheted penis warmer than a dragon body.
ReplyDeleteI agree that the instructions take some getting used to, but the finished Toothless is gorgeous!
DeleteFor future reference, (Sc 1, inc 1) 6 times around (18) means:
place 1 single crochet in the first stitch, place 2 single crochet in the next stitch, place 1 single crochet in the next stitch, place 2 single crochet in the next stitch, place 1 single crochet in the next stitch, place 2 single crochet in the next stitch.
This will increase the round from 12sc to 18 sc.
Hi, just wanted to say my wife wife and I love your pattern a lot. She made a Toothless for herself but I ended up hijacking it by voicing him giving him a personality so she made a second dragon, a light blue one she called Bluetooth. Then she started making some for our friends. We've just finished our tenth dragon.
ReplyDeleteAll the best!
Anyone have the pattern for the eyes? For some reason the link is broke and I can't see or download the eye pattern.
ReplyDeleteEyes:
ReplyDeleteThe acrylic felt that I used for the eyes can be purchased at Michaels, Jo-Ann's, AC Moore or any general craft store. You can find it in the kids craft section with the school craft supplies, pipe cleaners, pom-poms, popsicle sticks, etc. They come in small, individual sheets that cost about 25 cents apiece, so I buy plenty in case I need extra!
You can also use real felt if you desire, though I only have experience using the acrylic craft felt. I cut out the general shapes (you can right-click save the image provided at the top of this pattern and print it out and it should print to the correct scale, but it is just as easy to draw it yourself):
I use these scissors to cut out my eyes since they are small and precise. I fold the sheet of felt in half and cut out the general shape of the eye, a bit larger than I want it to be so I can cut it down, refine the shape and make the edges nicer. Folding it in half will give you two pieces that are generally the same shape, then you can cut them down and make them look nicer as I stated before. Do the same with the felt for the pupils.
Because of the bumpy texture of the crochet, I find that it is easier to use fabric glue to apply the eyes rather than sewing them on. The shape of the eye stays more consistent. I like to use Fabri-tac glue... be advised that it dries quickly and is quite permanent, so be careful when gluing your eyes on.
Thanks for sharing your pattern, I made one for my grandson and he loves it.
ReplyDeleteThank you for sharing, I love toothless! It's such a cute Amigurumi, too. Would it be ok to share the one I'm making on my blog? I would include credits and a link to your pattern.
ReplyDeleteIs Toothless's head supposed to be so much larger than his body?
ReplyDeleteI just made this, and I love it. Thank you so much for the pattern!
ReplyDelete